跟着大佬thmsgbrt构建Github主页 - Github Actions
thmsgbrt教程
跟着大佬thmsgbrt构建Github主页 - Github Actions
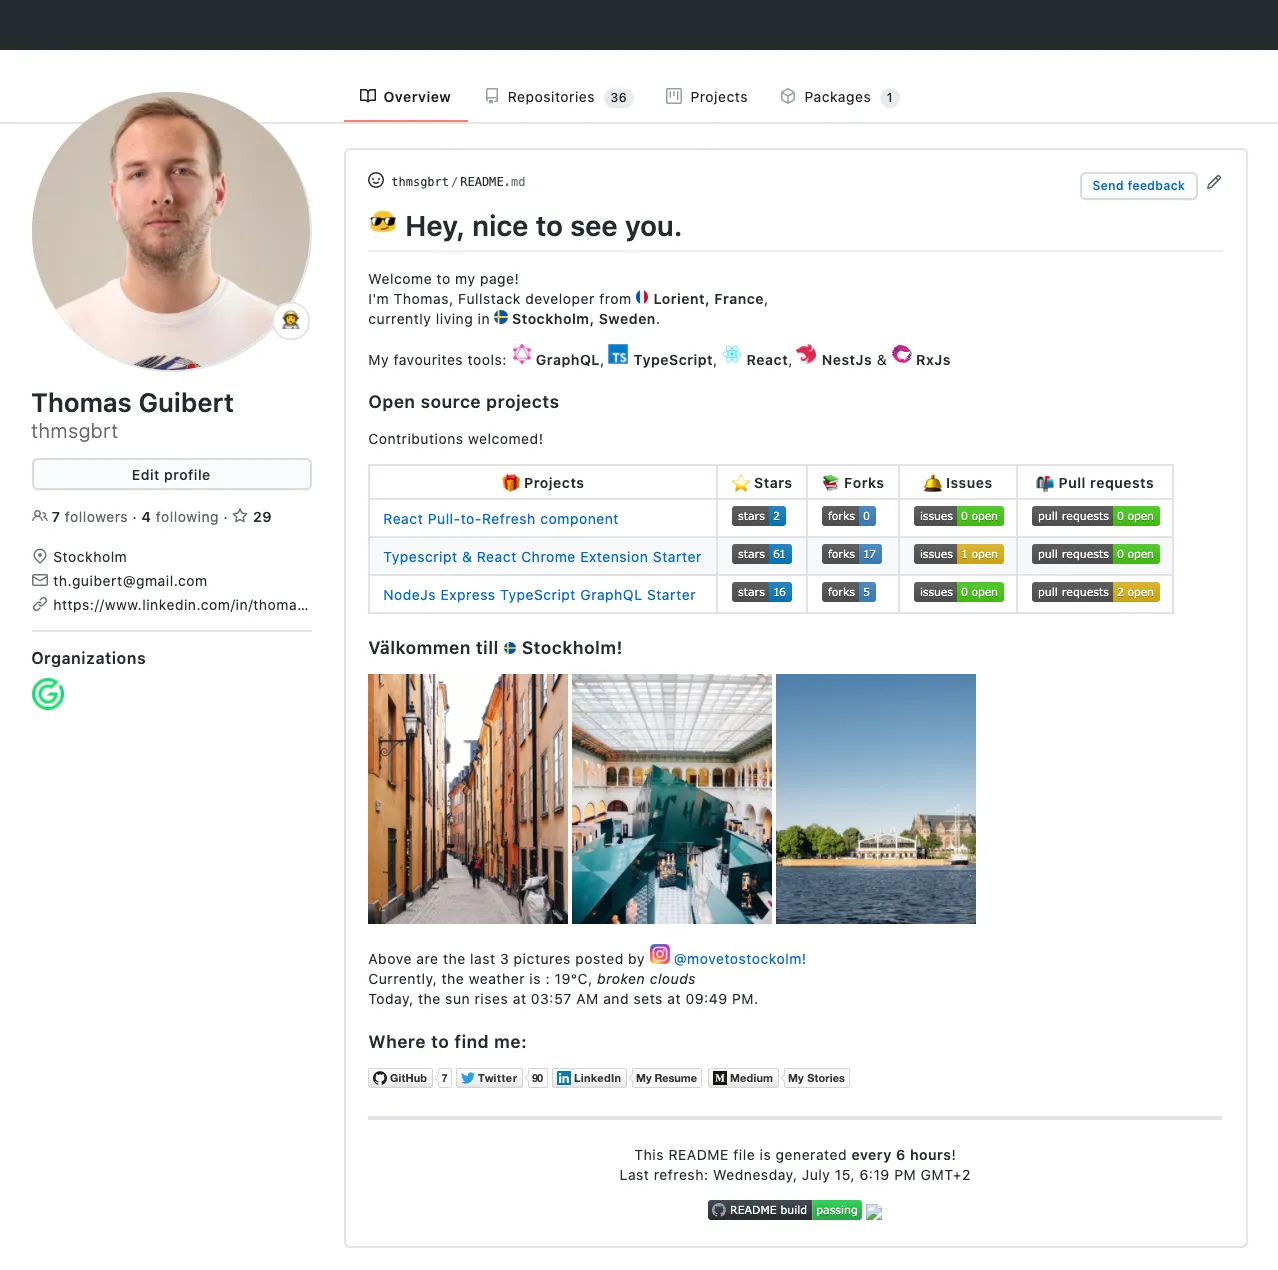 thmsgbrt主页
介绍
本文主要用于记录实现thmsgbrt构建Github主页的教程时的步骤与一些个人理解。
教程主页 : How to Create a Self-Updating README.md for Your GitHub Profile
项目仓库 : thmsgbrt/thmsgbrt
正文介绍
thmsgbrt的教程主要是配置GitHub的主页和学习如何使用GitHub Actions使主页动态化,例如自动获取天气信息等。
前几段介绍有项目使用包之类的,不过多描述,例如通过Puppeteer接口获取Instagram账户的信息,还有通过OpenWeatherMap获取天气信息、温度和日照时间等。
教程
创建存储库
创建一个与用户名相同的存储库。
项目准备
thmsgbrt主要是使用Mustache去创建模板,和更换标签。Mustache是一种没有逻辑的模板语法,称它为没有逻辑的模板,是因为它没有if语句、else子句和for循环,它只有标签。它通过使用散列或对象中提供的值在模板中展开标记来工作。
- IDE我是使用GitHub的codespace,也就是VSCode
- 如果本地没有js : 安装node.js,我安装的版本是node v20.16.0 (npm v10.8.1)。
1
nvm install 20
创建npm项目
- 在终端使用命令创建一个新的npm项目。
1
npm init
- 填写项目信息,参考npm文档。完成后若想修改信息可在package.json修改。
| 关键词 | 中文描述 | 样例 |
|---|---|---|
| package name | 项目名称 | home_page |
| version | 版本号 | 1.0.0 |
| description | 项目描述 | GitHub HomePage |
| entry point | 项目的入口文件 | index.js |
| test command | 项目启动时脚本命令 | node index.js |
| git repository | git的仓库地址 | https://github.com/DENGYaqi/DENGYaqi.git |
| keywords | 项目关键词 | github,readme |
| author | 作者名字 | DENGYaqi |
| license | 发行项目证书 | BSD-3-Clause |
使用Mustache
- 使用Mustache,运行命令行后生成node-modules文件和package-lock.json文件。
- node_modules是安装node后用来存放用包管理工具下载安装的包的文件夹。比如webpack、gulp、grunt这些工具。
- package-lock.json文件的作用: a)记录模块与模块之间的依赖关系 b)锁定包的版本 c)记录项目所依赖第三方包的树状结构和包的下载地址,加快重新安装的下载速度。
1
npm i mustache
- 创建mustache模板,打开main.mustache文件,填入最简单的: My name is and today is .
1
touch main.mustache
- 填入内容 :
1
// My name is  and today is
- 通过index文件里的Mustache生成ReadMe.md文件。
1
touch index.js
- 在index.js文件内填入以下内容。修改name为你的名字,其他可看情况修改。
1
2
3
4
5
6
7
8
9
10
11
12
13
14
15
16
17
18
19
20
21
22
23
24
25
26
27
28
29
30
31
32
33
34
35
// index.js
const Mustache = require('mustache');
const fs = require('fs');
const MUSTACHE_MAIN_DIR = './main.mustache';

/**
  * DATA is the object that contains all
  * the data to be provided to Mustache
  * Notice the "name" and "date" property.
*/
let DATA = {
  name: 'Thomas',
  date: new Date().toLocaleDateString('en-GB', {
    weekday: 'long',
    month: 'long',
    day: 'numeric',
    hour: 'numeric',
    minute: 'numeric',
    timeZoneName: 'short',
    timeZone: 'Europe/Stockholm',
  }),
};

/**
  * A - We open 'main.mustache'
  * B - We ask Mustache to render our file with the data
  * C - We create a README.md file with the generated output
  */
function generateReadMe() {
  fs.readFile(MUSTACHE_MAIN_DIR, (err, data) =>  {
    if (err) throw err;
    const output = Mustache.render(data.toString(), DATA);
    fs.writeFileSync('README.md', output);
  });
}generateReadMe();
- 在终端运行命令以生成ReadMe.md文件
1
node index.js
使用Github Actions自动化
- 使用Actions自动生成Readme.md,Actions最主要的文件就是workflows和yml配置文件。
1
2
3
mkdir .github && cd .github && mkdir workflows

cd ./workflows && touch main.yaml
- 生成main.yml文件后填入以下yml内容。如果想自己设定配置内容,可以阅读文档。yml内容解释:
- 第 3 行至第 8 行定义了何时触发该操作:
- 每次推送到主分支时。
- 或指定的时间表,此处为6小时。
1
2
3
4
5
6
7
8
9
10
11
12
13
14
15
16
17
18
19
20
21
22
23
24
25
26
27
28
29
30
31
32
33
name: README build

on:
  push:
    branches:
      - master
  schedule:
    - cron: '0 */6 * * *'

jobs:
  build:
    runs-on: ubuntu-latest

    steps:
      - name: Checkout current repository to Master branch
        uses: actions/checkout@v1
      - name: Setup NodeJs 13.x
        uses: actions/setup-node@v1
        with:
          node-version: '13.x'
      - name: Cache dependencies and build outputs to improve workflow execution time.
        uses: actions/cache@v1
        with:
          path: node_modules
          key: $-js-$
      - name: Install dependencies
        run: npm install
      - name: Generate README file
        run: node index.js
      - name: Commit and Push new README.md to the repository
        uses: mikeal/publish-to-github-action@master
        env:
          GITHUB_TOKEN: $
最后
恭喜完成!接下来可以自定义一些内容,thmsgbrt的教程中带有一些例子,可做参考: Tim Burgan的主页、Simon Willison的主页。
回顾
- 手动生成ReadMe : 修改index.js文件后可通过node index.js自动生成ReadMe.md文件。
- 通过main.mustache修改Readme的内容。
本文由作者按照 CC BY 4.0 进行授权